Triangle Choke in BJJ Explained
by Team Digitsu
Updated: March 24, 2025
The Triangle Choke is a fundamental and formidable submission technique in Brazilian Jiu-Jitsu (BJJ), a martial art that prioritizes ground fighting and submission holds. This technique involves encircling an opponent's neck and one arm with your legs, forming a figure similar to a triangle, which gives the move its name. When properly executed, it applies constricting pressure to the carotid arteries, potentially leading your opponent to tap out or lose consciousness.
Tracing its roots to the early days of BJJ, a martial art developed by the Gracie family, the Triangle Choke stands out as a testament to the effectiveness of leverage and technique over brute strength. It gained worldwide recognition, especially during the early Ultimate Fighting Championships, where Royce Gracie demonstrated its efficacy against larger opponents. Your grappling arsenal in BJJ would be incomplete without a solid understanding of this versatile choke.
The Triangle Choke doesn't just illustrate the strategic depth of BJJ; it is also a clear example of how this martial art evolved alongside Judo. While the choke's history is woven into the fabric of BJJ, it continues to be refined through practice and competition, ensuring its position as a staple technique for both novices and seasoned practitioners alike.
Fundamentals of Triangle Choke
The Triangle Choke is an effective submission technique that targets your opponent's neck. Mastering the fundamentals is crucial for its successful application.
Understanding the Position
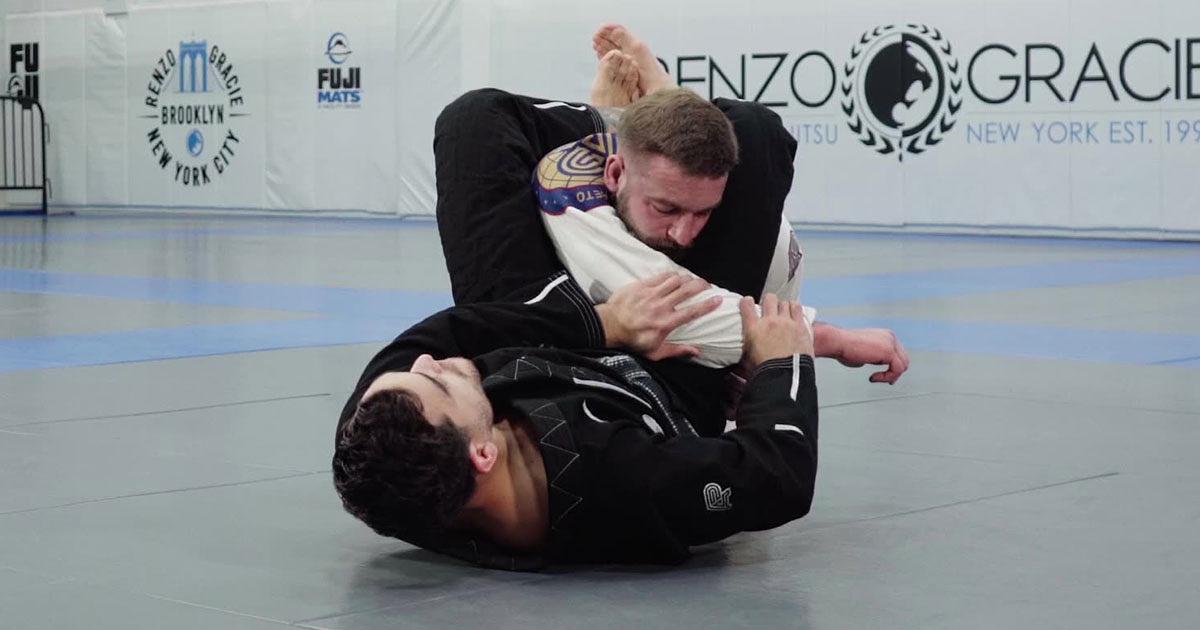
To initiate a Triangle Choke, you start from the closed guard, ensuring control over your opponent. Your goal is to isolate one of your opponent's arms and encircle their neck with your legs, forming a triangle. The position not only controls your opponent but also sets the stage for applying precise pressure.
Mechanics and Pressure Application
The efficacy of the Triangle Choke hinges on your ability to apply pressure to the neck, specifically the carotid arteries. By squeezing your legs together and pulling your opponent's head downward, you create a vise that cuts off blood circulation, leading to a submission.
-
Key Points:
- Cross your ankles to form a tight triangle.
- Pull your opponent's head down to increase pressure.
Legs and Hips Coordination
Your legs and hips play a pivotal role in the successful execution of a Triangle Choke. Proper coordination is essential:
- Clamp down with your legs, engaging your thigh muscles.
- Utilize your hips to lift and generate additional pressure against your opponent's trapped neck.
Remember: Effective leg movement is more important than brute strength, and correct positioning of your hips can make or break the choke.
Gi Versus No-Gi Variations
The triangle choke is a staple submission, but its application varies significantly depending on whether you're training with a gi or without one. The gi provides additional grip points which changes the approach you'll take, while no-gi demands a focus on limb control due to the lack of fabric to hold onto.
Applying Triangle Choke in Gi
When executing the triangle choke in gi BJJ, you have the advantage of using the gi itself to control your opponent. The collar & sleeve grip are key components here. To effectively apply a triangle choke, secure a collar grip to break down your opponent's posture. This helps prevent them from standing up or creating space to escape. With the sleeve grip, you can control one of their arms, making it harder for them to defend or counter your attack. These grips can also be used to set up the choke by manipulating their arm position, essentially forcing one arm in and one arm out—a prerequisite for locking in the triangle choke.
Adapting to No-Gi Scenarios
Without the gi, you must rely more on underhooks, overhooks, and limb control since you can't grab onto no-gi clothing. The principle remains the same—one arm in, one arm out—yet achieving this without a gi often requires a different strategy. In no-gi, you will need to use body locks, wrist control and clinching techniques to break your opponent's posture and keep their arm trapped while you shoot your legs up to secure the triangle. It's essential to maintain a tight clinch with your legs to compensate for the lack of fabric grips, preventing your opponent from slipping their head or arm out.
Positional Considerations
Executing a triangle choke efficiently relies heavily on your ability to navigate and control various positions. Each position offers unique advantages that you must exploit to secure the choke.
Closed Guard Initiations
From the closed guard, your legs wrap around your opponent, giving you multiple offensive options. To initiate a triangle choke from here, focus on creating an angle and controlling an arm. You'll need to pull your opponent's arm and posture down, often utilizing wrist control or an overhook. Once their arm is inside your guard, it's critical to clamp down on their neck with your leg while keeping the other arm outside. This will set the stage for the choke.
From Mount to Triangle
When you're in the mount position, transitioning to a triangle choke involves a complex array of movement. You'll generally want to control one of your opponent's arms and move to a high mount. From there, pushing the arm to the side and quickly transitioning to S-Mount can allow you to swing your leg over their head. Your aim should be to capture their head and one arm between your legs, while leaving the other arm free. This position is highly controlling and often unexpected, setting up a tight triangle choke. Understanding this positional flow is crucial to a smooth transition.
Side Control Transitions
Transitioning to a triangle choke from side control requires you to dominate your opponent's upper body while maneuvering your legs into position. To initiate, work towards isolating the near arm, which involves pushing it across their body or using your own body to pin it. Subsequently, you must move to a north-south position briefly as you bring your leg over their head and lock in the triangle. The key in side control is ensuring the trapped arm is secured and preventing your opponent from regaining a defensive posture.
Defensive Strategies and Counters
In BJJ, safeguarding against a triangle choke demands a fusion of keen awareness and precise technique. Recognize common escapes and apply preventive measures to maintain posture and control, thus mitigating the risk of strangulation.
Recognizing Common Escapes
To escape a triangle choke, the central focus is to create space and improve your position. Ideally, you should act promptly by placing your trapped arm's palm on the thigh of the opponent's choking leg. Here's a tactical sequence:
- With palm on thigh, use your free arm to grip the knee of the same leg.
- Push the thigh to the floor, leveraging both arms to alleviate choke pressure.
Remember, positioning is critical to disrupting the choke's mechanics; act before it's fully secured.
Preventive Measures and Posture Control
Preventing a triangle choke begins with a strong posture; it is a cornerstone of good defense.
- Keep your head up and back straight to reduce vulnerability.
- Positioning your arms wisely—one in and one out—is crucial to avoid giving the opponent an opening.
To actively prevent the choke:
- Anticipate the attacker's legs moving to position.
- Control the inside space, thus deterring leg placement.
Maintaining a robust and alert posture minimizes your risk of being caught in a triangle choke.
Triangle Choke Entries and Setups
Mastering the triangle choke in BJJ requires a strong grasp of entry techniques and versatile setups. Efficient entries can lead to a high-percentage submission while creative setups allow you to capitalize on your opponent's vulnerabilities.
Standard Entry Techniques
To execute a successful triangle choke, your entry should include off-balancing your opponent and ensuring proper knee penetration. In the closed guard, it's vital to break down your opponent's posture. A common approach is to control an arm and direct your knee inside their bicep, creating an opening for your leg to swing into the triangle position. From here, adjusting your hips and securing your partner's arm across their body are critical steps to finalize the lock.
-
Step by Step:
- Break opponent's posture in guard.
- Control one arm and place knee on the bicep.
- Swing leg over the neck to lock in the choke.
Learning these foundational methods from recommended guides, such as the one found via BJJ Success, enhances your understanding of the choke.
Creative Setups from Various Positions
As you progress, exploring creative setups from diverse positions, such as the open guard or from a swept position, increases your chances to catch opponents off guard. For instance, a sneaky triangle setup from closed guard involves using misdirection or feints to encourage an opponent to place a hand on the mat, allowing you to initiate the triangle entry sequence.
-
Example Strategy:
- Feint a move to induce opponent's reaction.
- Swiftly transition to the triangle setup.
Expanding your repertoire with these alternative setups can be greatly benefited by understanding the 17 ways to execute a triangle from Infighting and applying them in practice.
Advanced Variations and Transitions
Mastering the triangle choke involves understanding its advanced variations and knowing when to transition between them. These intricate adjustments cater to different scenarios you might encounter during a match.
Arm In and Arm Out Scenarios
When you're securing a triangle choke, having an opponent's arm in or out creates vastly different situations. An arm in strategic approach uses the opponent's arm to tighten the choke; your leg pressure must be methodical to ensure efficiency. Conversely, for an arm out scenario, you must skillfully maneuver your legs to maintain control without the arm inside the choke, requiring high-level dexterity and precise angling of your hips.
-
Arm In Scenario:
- Position your hips higher on the opponent's torso.
- Cut an angle to align your body perpendicular to the opponent to optimize pressure.
-
Arm Out Scenario:
- Focus on a secure leg position, as you'll lack the arm to apply additional pressure.
- Exploit transitions to other submissions if the choke isn't viable.
Exploring the Rear and Reverse Triangles
While the classic triangle choke is a staple, the rear triangle offers you an avenue to subdue an opponent from behind. This variation is particularly effective when your opponent turns their back, allowing you to trap one arm and their neck with your legs, creating a formidable choke.
The reverse triangle takes this further when you're positioned underneath your opponent. This variant involves wrapping your legs around the opponent's nearest arm and neck, again applying a choke but with your body inverse to the typical front-facing setup.
-
Rear Triangle:
- Lock your legs around the opponent's arm and neck, securing the position.
- Apply pressure by squeezing your knees together and pulling down on the opponent's trapped arm.
-
Reverse Triangle:
- Execute from your back, capturing the opponent's arm and neck as they face away from you.
- Ensure your top leg hooks securely behind your other knee to maximize the choke's effectiveness.
Understanding these advanced variations and knowing how to transition between them enhances your grappling repertoire and increases your chances of victory in high-level competition.
Combining Submissions with Triangle Choke
Mastering the Triangle Choke not only presents a direct threat to your opponent but also opens up opportunities for a variety of submission combinations. In this section, you'll learn how to seamlessly transition from Triangle Choke to other submissions, enhancing your versatility and unpredictability on the mat.
Linking Armbar and Triangle
When you execute the Triangle Choke and find your opponent defending by posturing up, this can create the perfect opportunity to transition into an Armbar. Here’s how you can make the switch effectively:
- Secure the wrist: Capture your opponent's wrist that's inside the triangle.
- Adjust your hips: Shift your hips perpendicular to your opponent, creating the angle needed for the Armbar.
Transitioning to the Armbar maintains the threat level and often catches the opponent at a moment when they’re focused on escaping the Triangle, leaving their arm vulnerable.
Kimura to Triangle Series
If you start with a Kimura grip, your opponent may try to defend by hiding their arm, giving you the chance to set up a Triangle Choke. Follow these steps for a fluid transition to the Triangle:
- Maintain the grip: Keep a firm Kimura grip as you initiate the transition.
- Manage your legs: Swing your leg over your opponent's shoulder and lock the figure-four to secure the Triangle.
This series leverages joint locks to create openings for the Triangle Choke. By transitioning from Kimura to Triangle, you apply continuous pressure while actively pursuing opportunities to finish the fight.


